-
-
So you’ve just spent countless hours and dollars creating your first project. Now you want to know what to do for finishing. This is not an all encompassing guide, or even close to it. This is just intended as an intro to help you get going, that said there is a lot of information in here.
-
If you want to learn more there is a book by Bob Flexner called “Understanding wood finishing” that is worth reading and keeping. It will be helpful to read through this guide all the way once, if you are new you will save a lot of time reading up on finishing before you ever open your first can. Every technique touched on will have info online.
-
Safety: If you read nothing else in this guide read the part on safety, some chemicals are toxic. What is finish? “finish” is a clear coating applied as a liquid by brushing, spraying, or wiping with a cloth. Sometimes, “finish” can be an entire series of coats – stain, one or more coats of clear finish, or coloring steps in between.
-
It is the first thing anyone sees when they look at your work making it the most important aspect if you intend to sell it. Form and construction are critical, but often outside of the most people's grasp. Anyone can see a nice finish and be pleased by it. You can create the most beautiful piece, but if the finish is poor no one will want it.
-
Why do finish wood? Beauty, protection and preservation are the primary goals. Protection means both protecting the wood and the user: splinters are not a welcome guest at the dining table. Finished wood is also easier to clean and maintain. How do I prepare the substrate? Surface prep consists of filling/repair, sanding and cleaning.
-
Pore filling: What to use, what not to use. Gap filling, flaw treatment: Learning how to make mistakes vanish or blend, and choosing what to highlight separates the novice woodworker from the advanced. Tools for laying on your finish: Rags, brushes, rubbing pads and spray equipment.
-
What types are there? Oil base and film build are two main categories. Oil base finishes “protect from within”. A film lays on top and protects from the outside. ALL ARE FOOD GRADE. Once cured there is no finish that is harmful to ingest, it's a marketing tactic. If the highlight is “food safe” it must not have much going for it.
-
How is finishing different? It’s a separate discipline. Woodworking and carpentry is physics at work. Finishing is chemistry, invisible and all a novice has is what is on the can. This has led to a mythology, and marketers take advantage to sell their blend. There is a better way! Ever wonder how you could use that spoiled milk in the fridge?
-
-
-
It is very easy to take effective precautions when finishing wood.
-
Always wear rubber or nitrile gloves: besides preventing you from having sticky stuff all over your hands these prevent any solvents in the finish from seeping into your body via your skin. The first time you have a set of gloves melt and degrade on your hands you will be grateful to have been wearing them
-
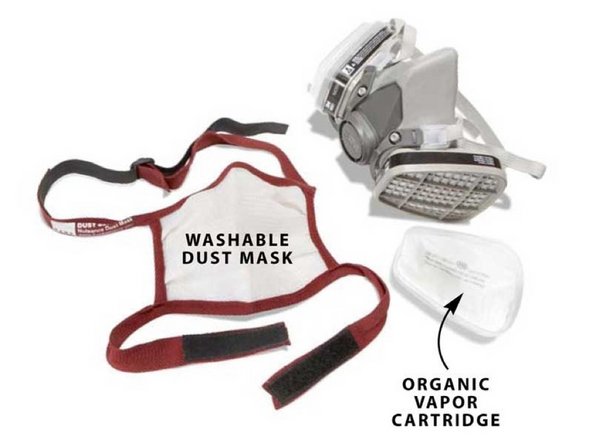
Wear a respirator: This is especially true when spraying, but if you smell something unpleasant when you open a can of finish you should have a respirator. Damage to lungs, and inhalation of carcinogens is irreversible. When I am talking about respirator in the case of finishing I am talking about an organic cartridge mask, usually labelled NIOSH.
-
If you can smell the finish through your respirator it is inadequate or it’s time to change the cartridge! Not all finishes are caustic enough to require a respirator, but if you're in doubt put one on.
-
Wear eye protection: finish will splash, spray guns broadcast media everywhere in a room. Eye pro will keep this stuff out of the delicate membranes of your eyes and keep your vision intact in case of a splash. If you are spraying and wear prescription glasses wear goggles over them, the finish will stick to your glasses and ruin the coatings.
-
If you wear contacts take them out before spraying! The solvents will seep in between your contacts and eyes and stick, its very unpleasant. The other option for contact wearers is a full face respirator (a good option for anyone)
-
Use common sense: Protect those around you! If you are dealing with something potentially vile and caustic don’t expose others to it, go into a dedicated finishing area, or take it outside. Wear long sleeves or a full spray suit when using HVLP or aerosol finishes. Think of the thinners in your finish as a poison, because they are one.
-
-
-
Most woodworkers don’t like this step as a consequence they rush through it and end up with poor results, then hate it even more. Take your time, go through the steps and have a nice finish. Once you have mastered it and found the finish that works for you it won’t be a big deal to get the repeatability you want, but surface prep is the foundation.
-
Understand what you are doing! Going through a monotonous task blindly doesn’t fulfill anyone. It will give you better control of the outcome and will lead to success.
-
A good finish begins with wood selection: If you want a high gloss smooth finish White Oak isn’t going to get there without a ton of work, and if you want to really show grain patterning and have a lot of texture Cherry just isn’t ever going to do it. Hopefully you will have read the guide on wood selection before you have gotten this far.
-
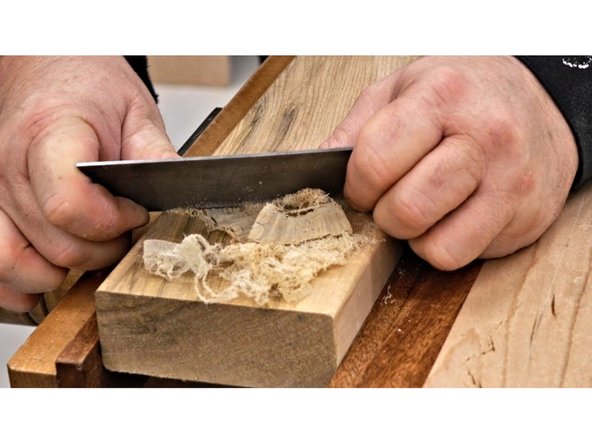
Card and cabinet scrapers: For very fast leveling, removing major imperfections. These will remove mill marks much faster than sandpaper. Can be followed up with 120 or 150 grit. Sanding grits: NEVER SKIP GRITS! Commonly available are 80, 100, 120, 150, 180, 220, and sometimes 320 and 400 (not on the wood itself, but in between coats of finish).
-
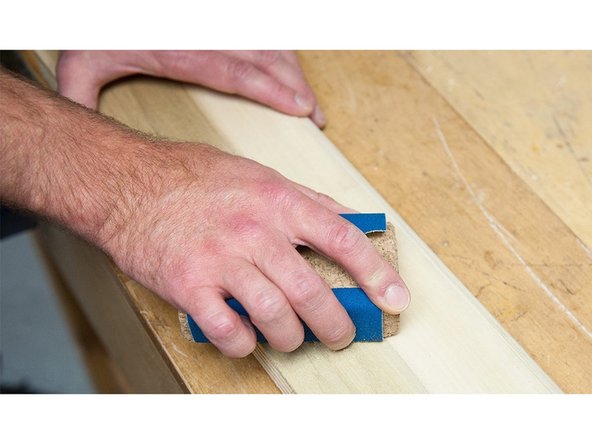
Sanding blocks: Never sand a flat surface without a block! Your finger pressure points will show on the finished product. Sanding blocks are also easier to hold onto and put power into than paper is.
-
Over-prep is a thing: “The wood looks better sanded to 400 grit, why wouldn’t the finish”? In the case of oversanding you actually ruin the bond between the substrate and finish. Unless specifically told do not sand higher than 220, between 180 and 220 the human eye loses its ability to pickup scratches. Film finishes rely on that “tooth” to hold.
-
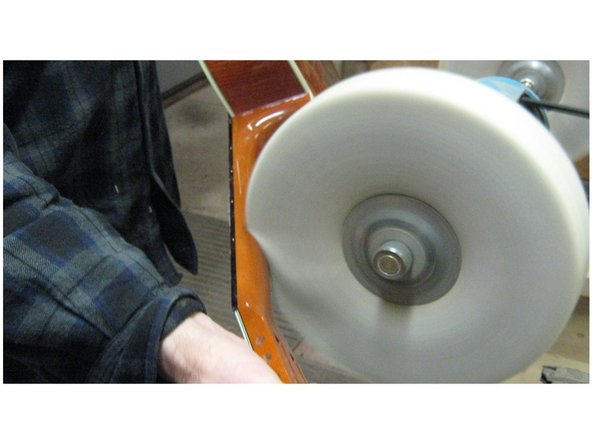
Sanding further than this also wastes a lot of time, spend that time doing a good job at what is necessary for the finish you are working with. The major exception to this is wood lathe, where certain finishes are designed to work with a polished surface.
-
Sanding should not take a lot of time! The starting grit will remove any glue, sawing, tool or milling marks, every step beyond that should just remove the scratches from the previous paper then move on!
-
-
-
• Selecting good lumber, cutting it, and shaping Are all steps where potential problems can be prevented, making the next steps much easier.
-
• Sanding or smoothing the surface. Again, most workers don’t like this step. Learn what tools will save you time and fatigue (learn to use a card scraper and cabinet scraper!). Think through what you need to do to accomplish the finish you are looking for, knowing what you want to acheive will help relieve the monotony.
-
• Dealing with glue Any glue left behind will show up as splotches or stains under your finish, and they cant be fixed without taking off the coating over them.
-
• Correcting surface imperfections: Dents, gouges, checks, gaps from glue up are all common problems. Fix them before your first coat of finish!
-
Hand sand after you machine sand: This is only necessary at the very last step: When you have completed your final grit hand sand the piece with the grain at the final grit. This will remove any swirls or “pigtails” left by the machine and blend the final sanding with the wood grain.
-
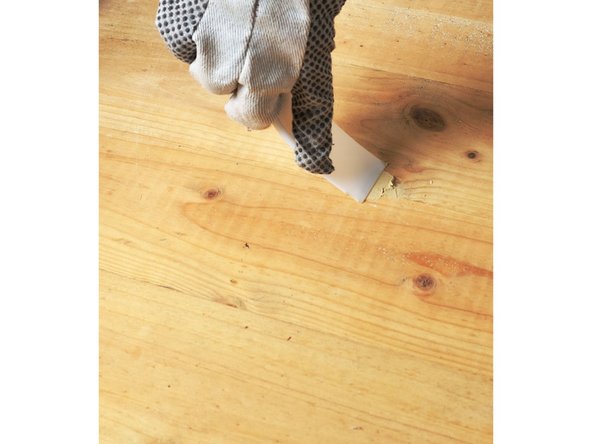
Tack Cloth: This is a rag impregnated with beeswax. It is designed to blot on and off of the surface to remove any final dust bits. Make sure to blot with this, not wipe or you will wipe the wax into your surface.
-
Wipe the wood down before you start with the same solvent as your finish uses. This isn’t always necessary but in the case of very oily woods it can help prevent splotching. Your test pieces will dictate if this is necessary.
-
-
-
All woods have a natural texture resulting from the size and distribition of the woods pores. This texture has the largest overall effect on the appearance of wood. (Think of a piece of maple vs oak, the color is similar but they look different). By filling these pores to different extents you can significantly change the appearance of a wood.
-
Sealers: Used to penetrate into the pores of lumber these will cure and stop finish from flowing into them. Every first coat of finish is a sealer. Separate, dedicated sealers exist that are easier to sand than certain finishes, making initial surface perfection easier.
-
Filling the pores with finish: Lay on a few coats and allow it to cure. Cut it back with your final sandpaper grit (probably 220, maybe 320 if you are using a finish that melts into itself). This is possible with any finish that cures hard (so no oil, wax, oil varnish blends). If you still have minor imperfections just add another coat.
-
The problem with this is it can be very slow, if you are working with something tight grained like maple or cherry it might work in one coat, but if you are working with a larger pored wood such as oak or walnut you will be better off with a dedicated pore filler.
-
Paste wood filler: This is a binder (finish) with finely ground silica added for body. You can add pigments if you want the grain to pop. These are usually oil or varnish based, I prefer water based because the dry time is much faster.
-
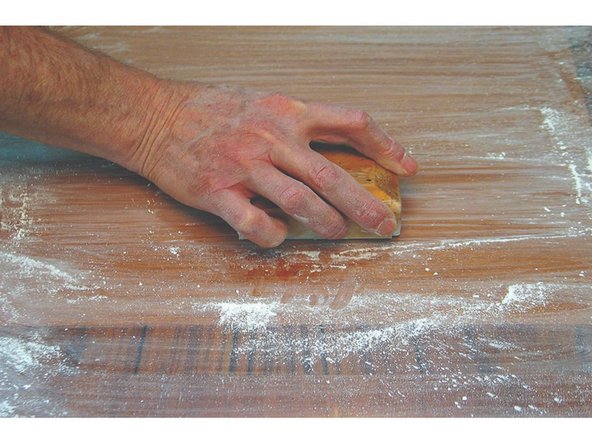
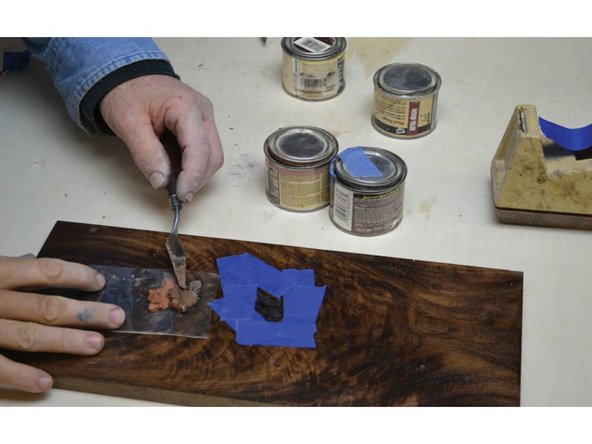
Egg white: This is my go to pore filler, it dries quickly, can be pigmented, is super cheap, sands and scrapes easily and I almost always have eggs around. Like other fillers, and wood itself this isn’t water proof; but your top coat will absorb into them and give protection.
-
Just separate the white from the yolk, discard the yolk and mix the white with some sanding dust from your project, and rub them on to the surface (don't get them frothy) with your fingers or a fine cloth, let it dry and sand off.
-
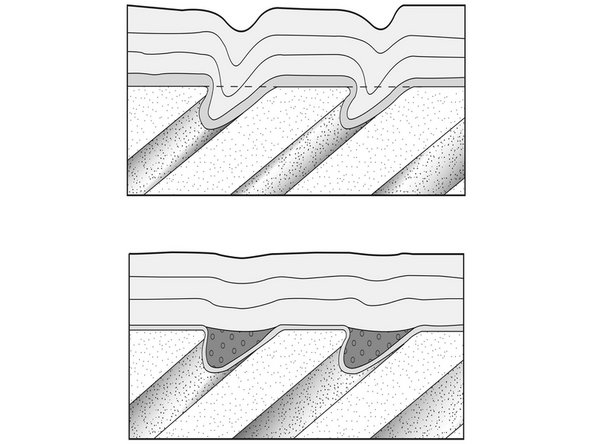
Remember when you are filling pores: The smoother your fill job the less sanding there will be to do! First: Block sanding to flatten a filler coat. Second: Unfilled vs Filled. Third: These drawings represent how layers of finish will react with the wood grain on an unfilled vs a filled piece.
-
-
-
NEVER USE PVA GLUE to fill a void, or to fill grain. Never mix pva and wood shavings to fill a void as those shavings are now saturated with pva and will not take finish, they will show up as a different color after finishing. PVA patches will show until the end of time, it rejects stains, finishes, and sands poorly.
-
Wood putties are used to fill mid sized problems in woods, they are similar to wood filler except that they use wood dust as the bulk agent. Epoxies can be used to fill large problems such as knots, cracks and checking. Just beware that they will never match the wood perfectly, this is more of a Wabi-Sabi approach.
-
Wood Patches can be made from off cuts of the same wood. These work if you have a gap in a dovetail, or a straight crack in the end of a board, Tearout: The best way to deal with this is prevent it. Learn to read the grain, pay attention when milling. If you get tear out that is too deep to sand, wood putty is likely your best option.
-
Hide Glue: Unlike PVA glue hide glue will accept finish. The natural pigment of hide glue is very similar to oil finishes so it can make a good mask, mix it with dust from the wood you are working on for larger problems. Test it first. Hide glue does not like heat so do not machine sand.
-
If a hide glue repair doesn’t turn out well you can remove it with hot water and a rag or steam. Hide glue can also be used for crackle finish.
-
Dents: Can often be fixed with steam. Pre-heat a clothes or soldering iron, make sure the tip is clean, Fill the dent with water and touch the iron tip to the water. Do not allow the iron to touch the wood. This rapid heating of the water in the wood causes the wood fibers to expand. It must dry overnight before final sanding and finishing.
-
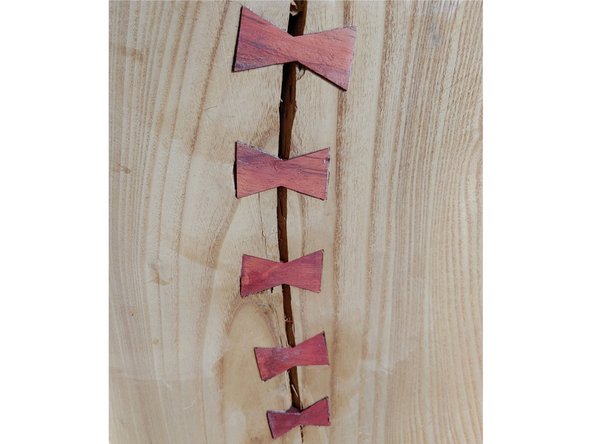
Dutchman joints (aka butterflys) Are used to prevent a crack from spreading, or to strengthen an area that has cracked or split and been repaired. There is a guide on this available as well. Wax crayons: Used AFTER finish to fill small flaws and pinholes.
-
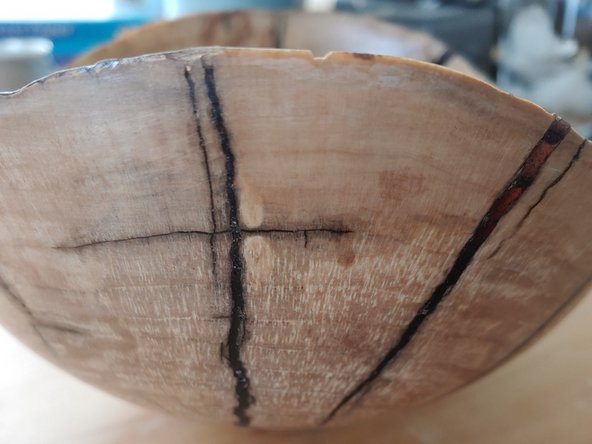
One last word on repairs: Even if you are a repair expert, damage will still show, embrace it and do your best, fine woodwork is handmade, small flaws add to the charm. Left: Cracks were filled with epoxy in this bowl as it was turned. Middle: Mix tinted fillers near the repair site. Right: Iron, water and a cloth to pull a dent.
-
-
-
Rags: Old cotton shirts work best. All the lint has already been pulled from them by washing and drying. If this isn’t available paper towel can generally work. NEVER THROW AN OILY RAG AWAY. The drying agents in oil based finishes can heat and cause combustion. Instead lay it flat, or hang it from a line. Once it is dry you can discard it.
-
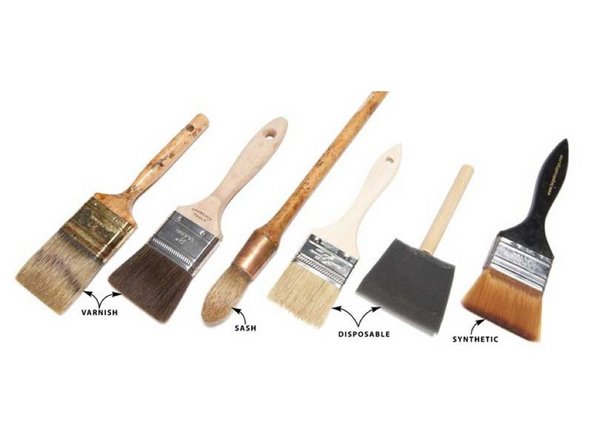
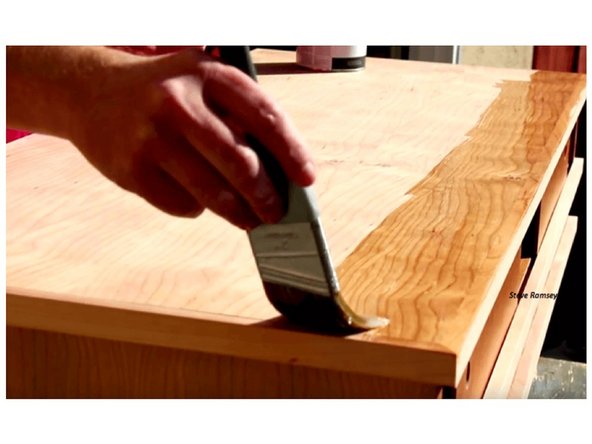
Brushes are the oldest finishing tool and still work. Make sure you understand what brush your finish needs Some examples of brushes are: Foam, China Bristle, Synthetic, and Natural. A little time spent figuring out your needs and buying a quality brush saves time and heartache. Also ensure you buy the correct solvent to clean the brush
-
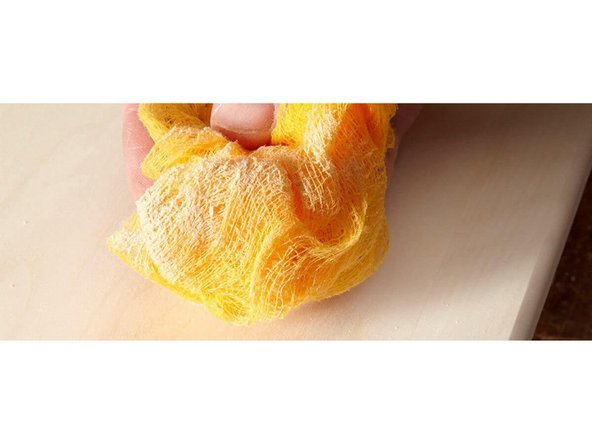
Rubbing pads You can make these yourself: The outer layer is a non stretchable natural cloth and the inner ball is made from something absorbant. Cotton or linen are traditional for the outside, where gauze works best inside, old T-shirts will work for both though.
-
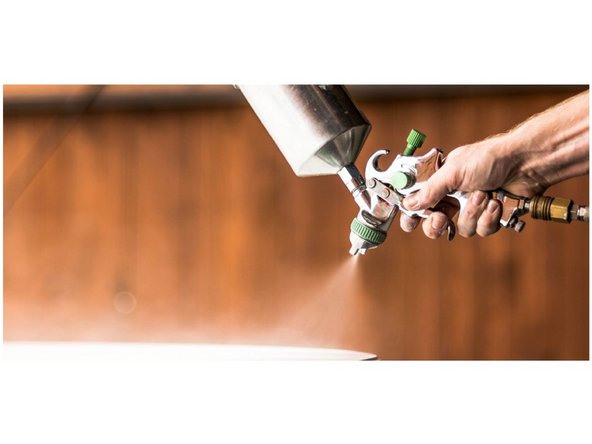
Spray equipment This is the fastest and most efficient method, but also the most expensive. Beside the cost of the gun you will need a large compressor, full safety gear (an organic respirator is required, non-optional), a place you can spray, and cleaning equipment. Because of the cleaning requirements it rarely makes sense to spray small parts
-
Unless you are finishing multiple pieces or working on something large, or with a very complex shape brushing or padding will likely be faster than spraying factoring in clean up. If you get into spraying you need to spend time practicing and spraying test panels, each gun behaves different and everyone has preferences they must learn to work with.
-
If you are using the shops equipment budget at least 1/2 hour for cleaning the gun! You will want to pre-clean it to ensure the last job on it was adequate, and post clean to make sure its ready for next time, 15 minutes each Dust mask or respirator: You should always wear a dust mask when sanding, a respirator is required with some finishes.
-
Task lighting this is the true secret to brushing on a finish. By using a raking, reflected light you can see any problems in the finish and take care of it before it begins to dry. It's also useful during the sanding process to ensure you have all the scratches removed. Test pieces Complete these before you start on your final!
-
-
-
Main groups: One way to group finishes is how they “dry” Evaporative: the solute evaporates depositing a solid Shellac, Lacquer, Wood putties, wax (solvent is turpentine) Reactive: (can be reactive to air, or a 2k) Pure oils, varishes, polyurethane. Coalescing: (Solvent is glycol ether, thinner is water) Water based finishes, “all in one” finishes,
-
Durability is the strength of the finish film to resist damage. For example, polyurethane, initially introduced in the 1960s as a no-wax floor finish, would be a durable finish. If ease of use is important, then a wipe-on finish like Danish oil or an oil varnish blend can be used. A wipe-on finish is much easier to use than a brush or a spray gun.
-
Since a polyurethane finish dries slowly, it can be brushed on. Alternatives to spraying on a durable finish would be to use a pre-catalyzed or catalyzed lacquer or conversion varnish. These "catalyzed finishes" are a bit different than lacquer. Although they have different resins, they dry fast and are just as or more durable than polyurethane.
-
Color is another consideration when choosing a finish. Water-based finishes, acrylics, give the wood no color nor darken as they age. They work well on lighter woods such as maple, birch or pine.
-
If finishing a darker wood, such as walnut or mahogany, then one of the other finishes such as shellac or lacquer is better. They give the wood somewhat of a yellowish to yellow-orange coloring and also make the wood look richer and darken as it ages.
-
If drying time is important, shellac and lacquer finishes dry the fastest followed by water-based finishes. Varnish and oil take longer to dry, usually overnight in a warm room. Since lacquer dries the fastest, it works great when applied by a spray gun. Shellac and water-based finishes dry fast too, and can be either sprayed or brushed on.
-
Toxicity can be another factor in selecting a finish. One of the most toxic finishes is lacquer. It needs good ventilation. Some woodworkers find oil-based varnish thinned with paint thinner objectionable, but it’s not especially toxic. The least toxic finishes are boiled linseed oil and 100% tung oil, followed by water-based finishes and shellac.
-
Always do a test piece. Save some scrap wood, try your finish, making sure the color and sheen are good and there is no mottling or other issues. I usually do at least 5 tests for a piece (sheen, tone, pigmenting, contrast, staining): it takes very little time compared to the rest of a piece. If you label well you can use them for future reference
-
-
-
• Straight oil: Usually Linseed or Tung oil (though “Tung oil finish” might not actually contain any Tung oil at all, look for 100% or pure Tung oil). Most often linseed oil will be “boiled”, which has nothing to do with adding heat. It actually uses metallic dryers (japan dryer) to speed the drying process.
-
Straight oils soak into the wood, leaving no film for protection. They have very little water resistance, no scratch resistance and dry slowly. It will dry flat or matte and soft. The only good thing about oil is that it is easy to apply, as it does very little to protect the wood itself. Not a good finish!
-
Polymerized oil: These are heated to 500°f creating long chain molecules, increasing the final gloss and hardness. It cures very quickly (in oil terms) and hard, resisting water and water vapor penetration. Unfortunately they are thinned which slows the film build process so it will take many (6+) coats to get protection. Examples: Tru-oil
-
Varnish that has been thinned “wiping varnish”: Not really oil at all, although most of the “oil finish” on the shelf is wiping varnish. Varnish is made by cooking one or more oils with synthetic resins, which melt into the oil and creates varnish. It dries glossy and clear, you can get wiping varnishes with a flattener added for a matte look.
-
The trouble with these “oils” is they have been thinned so much it takes a lot to get a significant film build, but once the film is built up you get an excellent barrier against scratches, water penetration and water vapor. Varnish thinned to your liking is a better option, and cheaper. Examples: Minwax tung oil finish, velvet oil.
-
Oil and varnish blends: Since wiping varnish is an oil/poly with resin melted in and thinner, it works with oils. The overall effect is some mixture between these two things, depending on the ratios used. Unfortunately it’s a bad compromise. If you want a durable, matte or flat finish use a varnish and a flattening agent or post finish flattening.
-
Wax: This is here because it’s most like an oil. It is easy to apply, produces a satin sheen and cures soft. It provides no significant barrier against heat, water, water vapor exchange or solvents. It does however reduce abrasive damage and so is viable as a top coat to hard finishes. Not a good finish on it’s own
-
What is this about food safety? Oil finishes all have the same ingredients at different ratios. Some are marketed food safe, if some are they all are. Lacquer is caustic, but once the solvent evaporates cotton is left, shellac is what M&Ms candy used to be coated in. “Food safe finish” is a marketing technique, don’t buy into it!
-
-
-
Film finishes are most commonly used in commercial applications. They are commonly sprayed on, requiring little post finish, they dry or cure quickly, and show good durability. Generally 3 coats hitting the preferred thickness is optimal: thicker can cause cracking, thinner risks the protection.
-
Post-Catalyzed: This means you must mix the components before you apply it. Pre-Catalyzed: This means the components were mixed by the manufacturer, ready to thin and apply 2K: A 2k finish has 2 parts, a body and catalyst. They don’t dry but instead cure. These tend to be very durable because they form long chain chemical bonds.
-
Conversion Varnish/lacquer a high solid, 2k post-catalyzed varnish/lacquer. Always sprayed. Very durable, slight yellowing will occur, very fast curing. Poor repairability because it is a genuine layered finish. Good for use in high moisture, heavy use areas. More expensive than other lacquers. Will darken with age.
-
Lacquer: Most commonly sprayed due to its fast dry times. If you are working on a small project it can be brushed on. Very durable, long lasting finish. Repair is easy because lacquer of any age will melt in to lacquer thinner. It buffs out very well using tripoli and a buffing wheel.
-
Lacquer is probably the most common finish for bespoke woodworkers and small shops, it is also inexpensive and fast drying. Will darken with age not suited for outdoor use. Sheen is expressed in ° (degrees) 90° being max sheen, no flattener added.
-
Polyurethane This is a broad category, you will find an array of poly for different uses. It can be applied in a number of ways, depending on the type and the desired outcome or availability of equipment. Good durability, can be had with UV inhibitors, easy application, poor repairability. Drying time and use conditions vary depending on mix.
-
Water base Don’t be fooled, these are still toxic chemicals, their solvent is glycol ether. They contain fewer VOC’s, have good wear resistance and are exceptional for indoor uses. Less durable than other finishes, with little chemical resistance, not suited for outdoor use, poor repairability, poor compatibility with other finishes. Fast drying.
-
-
-
Shellac: The oldest of film finishes, and the only non-petroleum based finish on this list, consequently it is the only one which smells pleasant as you work it. It is made from the secretion of the Lac beetle.
-
It is unique due to its versatility: It can be used as a pore filler, sanding sealer, pigment and aniline dye medium, binder and intermediate coat or as a finish all on its own. Shellac will stick to any other finish, and any other finish will stick to it.
-
So if you need to recoat a piece and are unsure what it had on it before a layer of shellac will act as a barrier between two other layers. It is also versatile for application: It can be brushed, sprayed, wiped or French Polished. It is available in Flake form or as a pre-mix.
-
In pre-mixed form the shelf life is limited and it will be thinned with denatured alcohol which contains methanol. Flake can be mixed with denatured alcohol or azeotropic everclear if you are looking for something that is safe to use in a confined space. It has fair durability and excellent repairability.
-
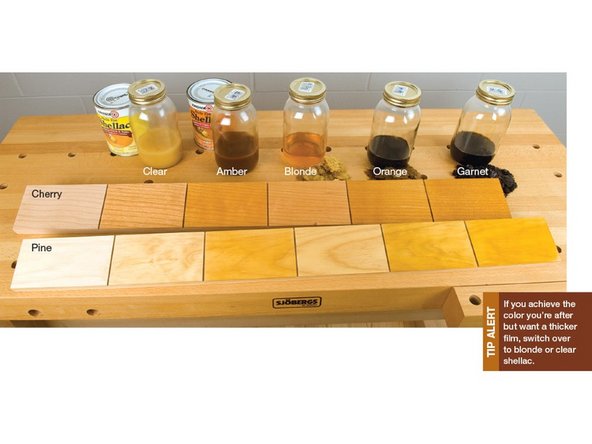
It is very chemical resistant with the caveat of alcohol, so it wouldnt be good for something like a bar top. Color ranges from super blonde to garnet, so you can get a nice natural yellow through orange tint from the shellac coats. It is very fast drying, but full cure hardness can take 7 days. Will darken with age.
-
Thin layers dry faster: and consequently build faster. Spray the thinnest layer you can get on wet!
-
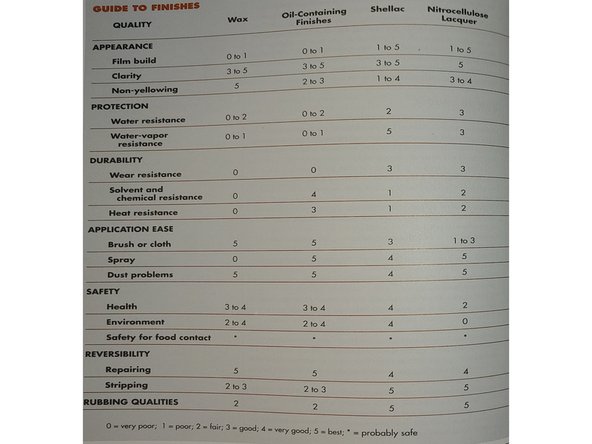
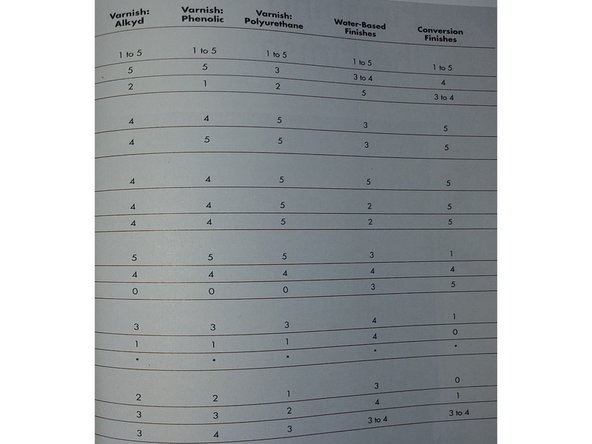
Choosing a Finish: Take a look at this table: Choose what you want based on ease of application, protection, coloration and longevity. The table comes from “Understanding wood finishes” by Bob Flexner.
-
-
-
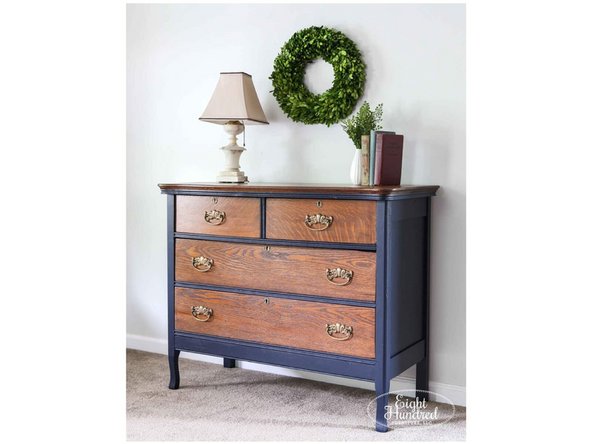
I’ve said before and in other guides to choose wood that has the appearance you want, and just use the finish to show off what nature has put there. That is still my stance on it. But what happens if nature doesn’t provide the color you want? What if the wood is very expensive, or isn’t available? That is where finishers can add and change color.
-
Pigments: Pigments are finely ground color solids. Could be wood dust, coffee grounds, commercial products, anything you want just make a test piece. Dyes: are chemical colorants. Toner: Dye or pigment mixed into your finish to change the color a small step at a time. Shading: Toner applied to selected locations.
-
Glaze: Color applied between seal coat and top coat. Stains: Dye or Pigment with a binder applied directly to wood. Gel stain: Thick stain, usually used for dramatic color shift. Bleaching: Oxalic acid and hydrogen peroxide. It lightens the wood color. Large shops bleach everything, then dye it for uniform color.
-
Burning / scorching: You can use a torch to burn some or all of a face of wood. Test first, and ensure you have a reliable way to put out the flame or your project will be up in smoke! This can create some nice textures
-
Ebonizing: This creates a jet black finish, it takes advantage of the natural tannins in certain woods. It is iron acetate, it can easily be made by dissolving a steel wool pad in vinegar. It does not work with all woods. You can use tea to increase tannin content in a wood, even better is Quebracho, it will allow you to turn any wood black.
-
Paint: Opaque, will cover wood grain and depending on the wood can also wipe out the woods texture. Milk paints are preferred for indoor furniture, they can also be used outdoor with a clear top coat.
-
Bone Black: I like this mixed with egg white to fill pores, it makes the grain pop on open grain woods like walnut and oak. It's free: I take a clean beef or bison bone, wrap it tightly in aluminum foil and put it in a hot grill for a half hour. It turns to fine powder in a coffee grinder! You could also buy artists bone charcoal I( guess).
-
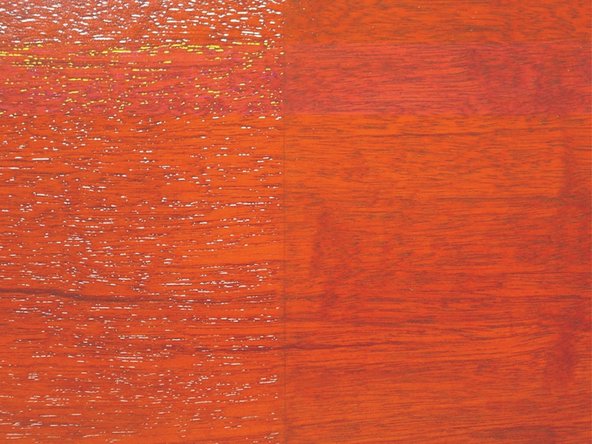
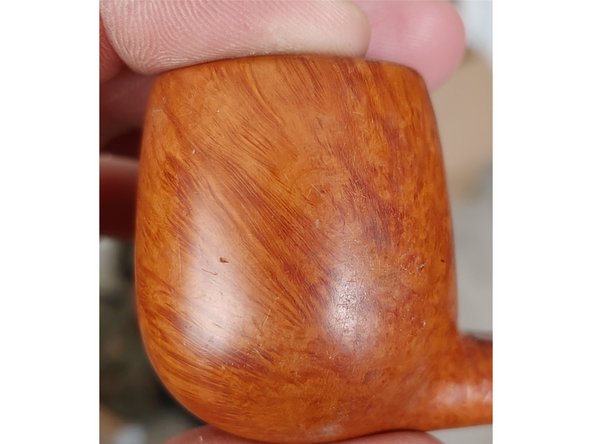
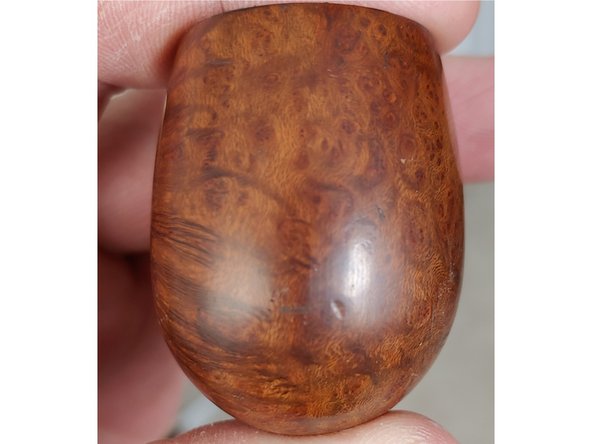
The two tobacco pipes shown are both briar. For pipes Briar is the best wood that can be used, flavorless and fireproof. It has excellent figure but not color. The left photo shows natural tone briar with a red contrast stain to highlight the grain. The right is simply a brown contrast stain and a tan dye. Both pipes are from the same block.
-
-
-
You can mix and match dyes, pigments, fillers, toner, glazing, bleaching... whatever you want. Just make sure to be mindful of the chemical compatibility. Do test pieces! And take notes on each step. You will be surprised how much changing the order of application will change the final outcome
-
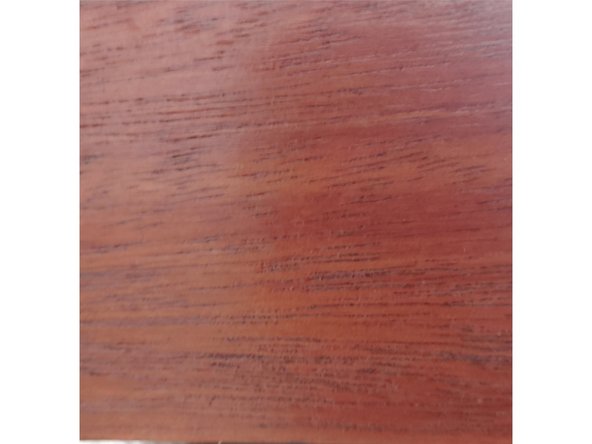
Use your imagination and a color wheel. Most of your finishing steps are transparent or transluscent rather than opaque, so how is the previous color going to look through the next layer? Good contrast can be subtle: a simple contrast stain could be a dark brown pore filler with a tan toner coat, it doesn’t take much to make something really pop!
-
Wood color can be intense! It’s all up to you, vivid neon green, plum purple, high gloss jet black, bleached bone white it is all possible. Figure out the process on some scrap and get the results you envision.
-
Don’t forget texture: Piano black over fully filled and prepped maple billet is going to be a reflective, mirror like finish. The same jet black applied sparingly over oak will still show the grain of the wood. Neither is right, its just preference.
-
Gloss coats under flat: Flat or matte finishes contain talc, which rises to the surface when curing and breaks the sheen (it's bound to the finish, to remove it you must abrade it from the surface) If you are doing multiple coats of finish the talc will look hazy. To avoid this, build layers with high gloss finish. With only the final coat in matte
-
You can break gloss yourself with 2000+grit sandpaper. A unidirectional sanding will be different from a DA machine. Test pieces are important! • A matte/flat finish is all in the way the outer surface reflects light. If you aren't sure how glossy you want the piece finish it out glossy, its much easier to go down in sheen than it is to go up
-
A flat finish shows fewer imperfections A perfect mirror shine like french polish takes a perfectly flat, smooth surface. If your prep work just isn’t there stepping down the gloss can help cover some imperfections. • Not every finish can be machine polished: research your finish to find out, but do test pieces.
-
Burnishing is achieved by stretching the finish flat with a smooth object. This is in effect french polish. The picture is extreme layering, with maple sanded to 220 grit. The pores were filled with egg white and bone black, resanded with 220, copper oxide wash, a cranberry juice dye, 90° laquer, 90° toner, and a 40° laquer top coat.
-
-
-
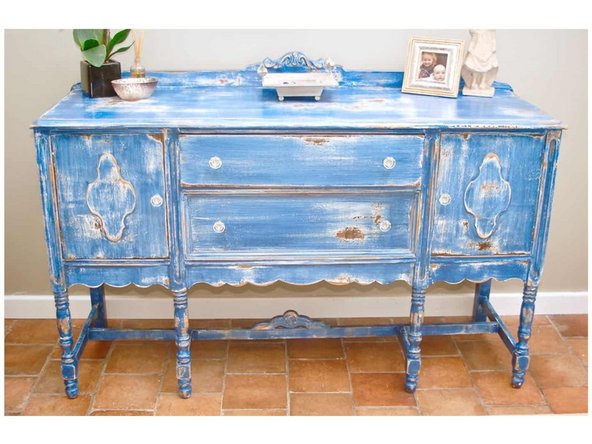
The recipe is simple: Curdle cows milk (either naturally or with citric acid), strain through cheese cloth, add pigment to what is in the cheese cloth to obtain the desired color. There are more convoluted recipes out there, just google it.
-
This is by far the most durable paint for indoor furniture. It can last for hundreds of years if protected from the elements Non-toxic, non-caustic, safe for consumption wet or dry... it’s just milk casein.
-
Cheap! If you have priced enamel paints lately you will know they are expensive. Even if you buy a gallon of milk, a bag of lemons and a fresh cheesecloth you will be into this for >$10.
-
Spoils quickly! Make it when you need it, use it up.
-
Available in powders. Don’t want to deal with spoiled milk and cheesecloth? No problem, it's available in powder form or pre made in a can. And these are stable for a long time.
-
Easily distressed: If you are looking for that distressed furniture look this is a great finish to use as a canvas.
-
-
-
A solvent: Will dissolve a cured finish, it turns solid to liquid.
-
A thinner: just thins a liquid
-
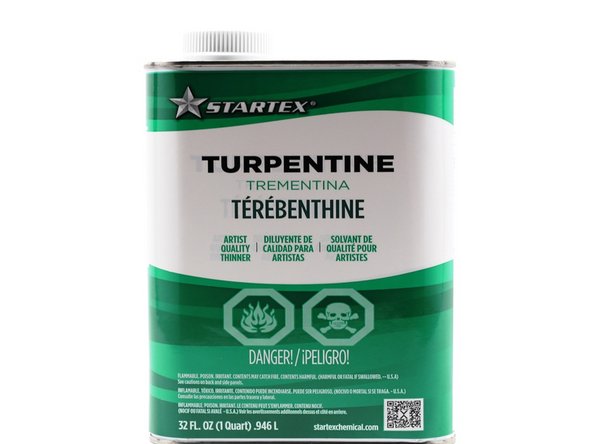
Mineral spirits: Solvent for wax, oil soluble dye stains. Thins wax, oil, varnish, oil and varnish based pigment stains
-
Alcohol: Solvent for Shellac, Lacquer, Water base, alcohol based dye stains, aniline dyes. Thins shellac and NGR stains
-
Lacquer thinner: Solvent for Shellac, Lacquer, Water base, oil-soluble dye stain. Thins Lacquer, Catalyzed lacquer, lacquer based pigment stain, NGR dye stain.
-
Glycol Ether: Solvent for Shellac, Lacquer, Water base, NGR dye stain, water based pigment stain. Thins water base.
-
Water: Solvent for water soluble dye stain. Thins water base.
-
Xylene: Thins short-oil varnished base pigment stains
-
-
-
Finish is destined to fail, mother nature is going to spend every moment trying to reclaim your furniture. Wood is meant to rot and return to earth, all we can do is prolong that. The thing is, with proper care a finish can last for hundreds of years (there are examples of shellac finished pieces that are original from the medieval ages)
-
A piece of furniture can be around as long as someone is able and willing to take care of it, or it is preserved in some way. The oldest piece of furniture known is a inlaid table from the tomb of King Midas, it dates to 696 BC. It was most likely finished in a dissolved copal resin (essentially varnish).
-
In practical every day use the oldest piece I know if is a bed in England that dates to the 16th century it is still in use and has been used by 15 generations. Depending on the use, environmental factors, the quality of work in the original finish, and the piece itself you can expect a good lifetime most out of any finish you apply.
-
When you're first starting wiping varnish is a great finish to master, it is easy and durable, buy a can of straight varnish and some thinner, mix small batches in a few ratios to figure out what you like. Shellac is also an excellent finish to work with, especially if you are forced to do your work indoors, in a confined space.
-
It can be a little more finicky than other finishes, but it is incredibly easy to correct. If you are able to spray: pre-catalyzed lacquer is excellent, it is easy to be successful with, very durable, easy to repair if you have a problem and inexpensive.
-
Keep it simple! Find one finish you think you will like and learn it as best you can. There is enough stuff in this realm to make anyones head spin. As you progress you can add more “stuff” to your arsenal, but mastery any one of the recommended finishes above will put your finished product above that of 95% of the woodworkers out there.
-
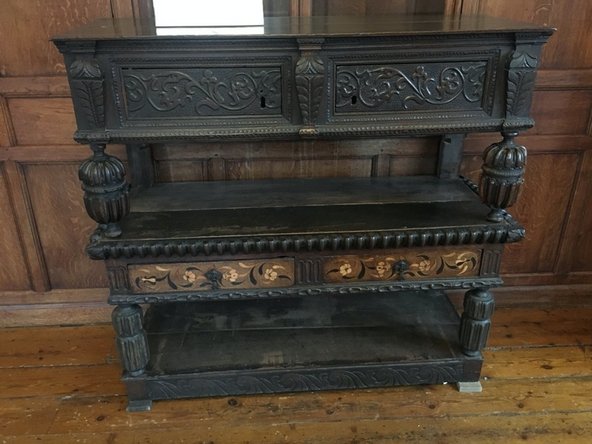
Left: Inlaid table from the tomb of King Midas 696 B.C. Middle: 17th century “buffet” It is actually made of oak but the original finish has darkened to near black with time. Right: A “poster” bed, 16th Century AD
-