
Introduction
3D printers work to turn a computer designed model into something real! This is done by heating up plastic filaments to “draw out” your design and build it layer by layer. Naturally, with something this intricate, there are lots of steps, and this guide will walk you through the basics of that.
-
-
The first step in any 3D print is to either find or create a digital 3D model. This is done in some sort of computer aided design (CAD) software, and this is where you determine the size, shape, etc. of whatever it is you are making.
-
If you don't know how to make your idea, that's okay! Websites such as thingiverse.com have a huge selection of models other people have created that are free to download and print.
-
-
-
3D printers don't know how to look at a digital model and determine how to print it, so before we can print it we have to help convert it into something the printer can understand. To do this, we use slicer software, such as Simplify3D.
-
Slicer software takes your 3D model, an STL file, and works to convert it into instructions that the printer can understand, GCode! Instead of just a large shape, GCode is a list of directions and movements the printer can follow to build up each layer of the model.
-
-
-
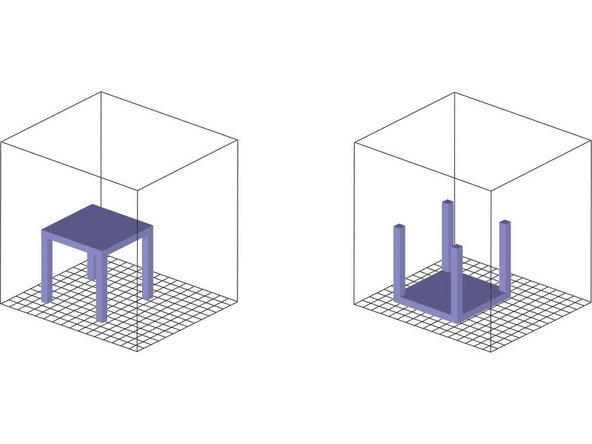
One of the most important things to determine in your slicer settings is the orientation that the print will be built in. Having the optimal orientation can remove the need for support, reduce risk of print failure, and even speed up your print.
-
Let's say I want to print a small table that I found online, and when I import it into Simplify, the table is set to build from the legs up, ending with the top surface. If I print it like this, I will have to generate support under the entirety of the table in order to be able to print the surface at the top.
-
By holding CTRL+L, and then clicking on a surface, Simplify will lay that surface on to the bed, changing the prints orientation. If I do this and lay the face on the bed, making it print upside down, I now have completely removed the need to supports, and have sped up the print time considerably. This seems obvious, but it is still very important.
-
-
-
There are a number of important settings you need to check in your slicer software before you are ready to print. One of the first settings to check on is layer height.
-
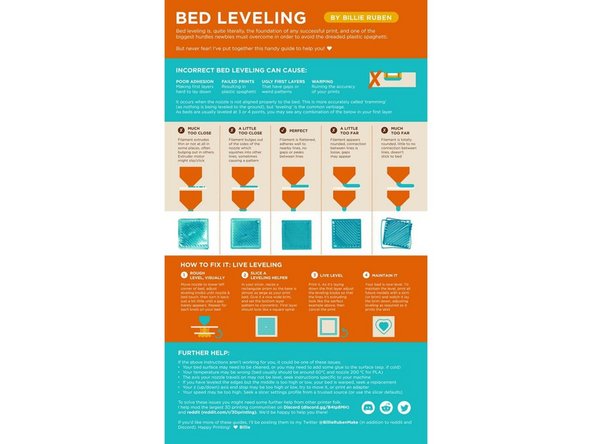
Layer height is the distance that the nozzle will be between the previous layer and the one it is currently drawing. Because 3D prints are built up layer by later, it is important to ensure that the printer is calibrated to the right layer height. We use [double check this number], and when printing on the public printers it should always be set to this.
-
If the layer height is off, the printer will not raise the nozzle the correct height between each layer, which can quickly lead to print failure.
-
-
-
Nozzle diameter helps the printer know how much filament it needs to push through. If the nozzle diameter is set too low, it will not push enough filament through. If set too high, it will try to push too much through and can clog your printer. The nozzles we use are [double check this number aswell].
-
-
-
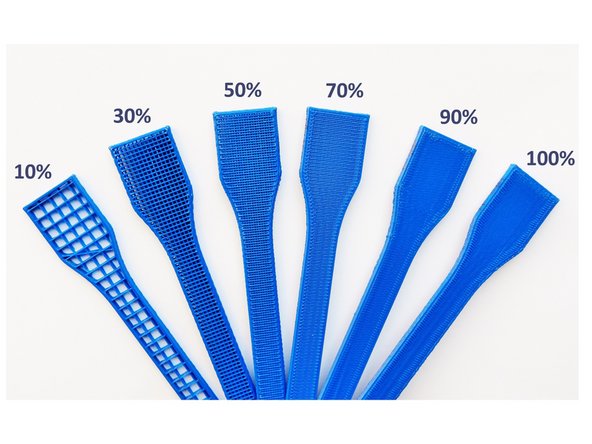
Infill percent determines what percent of the internal structure needs to be filled directly. The higher the infill, the stronger the print will be, but the longer it will take to print. An average print really doesn't need higher than 15% infill, although certain prints may require more based on what they will be used for.
-
-
-
Temperature has two different important settings, nozzle temperature and bed temperature. In order to help get the filament to stick to the bed during the first layer, the bed temperature is usually set to around 65°C.
-
The nozzle temperature will change slightly based on what is listed on your filament. Each type of filament should have a temperature range printed on the spool, and you should always check that your nozzle temperature is either within or very close to the listed range of your filament. Generally, a good baseline is somewhere around 220°C.
-
-
-
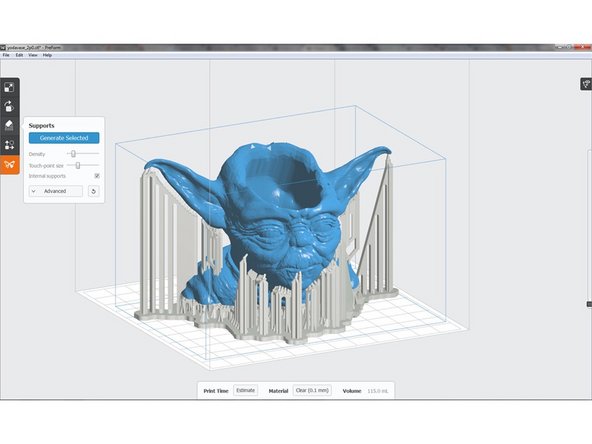
While often not needed, there are some prints that do require support to be generated in order for the print to not fail, or to ensure it looks good. Support is used when part of your print does not have any layer directly below it, and creates a temporary layer that can be removed after the print is done, used to hold up these raised portions.
-
If you determine that you do need support for your print, you can have the slicer software automatically generate it by clicking the generate support check box. By generating support, the slicer software will determine all of the areas without a layer beneath them, and creates less dense filament layers below to create a surface for the print.
-
-
-
Rafts are incredibly situational, and should be used only in rare and specific circumstances. Much like support, if rafts are needed, clicking the raft check box will tell the slicer software to automatically generate them.
-
Rafts are essentially a printed couple of layers below your actual model, meaning the print itself does not rest as directly on the bed. This can help with bed adhesion, but is usually only used for very tall prints that have little surface contact with the bed, as they can help keep the print stable and prevent it from tipping over.
-
-
-
Now that you have your design sliced, it's time to save it to an SD card and start preparing your printer!
-
-
-
Before you print you want to make sure you are using the right kind of filament. Filament can be made with a number of different materials, but for our purposes we are going to be using PLA. If you already have your desired filament in your printer, then you're ready to move to the next step. If not, changing the filament is a simple process.
-
The first thing you want to do is remove the old filament. Start by clicking the knob on your printer and navigating to the nozzle temperature setting (control -> temperature -> nozzle). Turn the knob to set the nozzle to at least 200°C, and then give it a moment to heat up.
-
Maybe just look at Tim's guide. He did a better job at this than I'm gonna do.
-
-
-
Tim also has a guide on this. Here are some neat pics. I'll do this part again soon.
-

![Layer height is the distance that the nozzle will be between the previous layer and the one it is currently drawing. Because 3D prints are built up layer by later, it is important to ensure that the printer is calibrated to the right layer height. We use [double check this number], and when printing on the public printers it should always be set to this.](https://d3t0tbmlie281e.cloudfront.net/igi/innovationlabs/nsUbkSlZOmP1Zb2u.medium)


One Comment
This is the really valuable article. As you told me how we can drop our best review on any blog post but I saw many blogs where users have only put the thanks and nice post. Read more : https://www.insightsoftechnology.com/how...
Janette R. Hidalgo - Resolved on Release Reply